Monday, October 29, 2012

Thanks, Hank's Oyster Bar

We tried out a new restaurant on Sunday in the neighborhood -- Hank's Oyster Bar at 633 Pennsylvania Avenue (replacing Ba Bay -- maybe if they had served Bahn Mis for dinner service they would have made it!).

As Hurricane Sandy hadn't arrived yet, it was still a pleasant day to walk for brunch.  I loved the design and style of the restaurant.

To start, I had to try the Grappling Grape (gin, concord grapes, citrus), to restore my faith in grape juice after my unfortunate run-in with Grapples earlier this summer.  I am happy to report this tasted tart and refreshing.


As I don't like oysters or other fish, I stuck with the crab cake eggs benedict.

All in all, a great addition to the neighborhood.  Good food, good service.

Sunday, October 28, 2012

Porch Project: Final Reveal!

I am relieved to report the porch stencil project is finally finished!  Just in the nick of time as Hurricane Sandy bears down on DC.

All in all, I love it!  I especially love the way the stair stencilwork adds a pop of color and interest to the front of the house.  


Here are my thoughts and tips to those interested in painting your porch/patio/steps:

  1. Do this project in the summer, or early fall/late spring.  I ran into time constraints with colder temperatures and waning daylight.  Also, we were hit with a lot of fall rain which hindered my progress. 
  2. Buy your stencil brushes from the stencil company!  They are hard to find in stores... and buy extra since they tend to fall apart/get stray 'whiskers' after prolonged use. 
  3. Consider your paint colors carefully.  While I love the colors used in the stencils themselves, I wish I had used a base layer that better matched the house instead of the bright white.  Maybe a light tan? 
  4. Consider the quality of the surface of concrete... I don't think I would have done anything differently, but it's worth considering applying a new surface of concrete or doing a better job patching holes and cracks in the surface.  From afar, the quality isn't terribly affected, but the paint doesn't mask the holes and other concrete issues.  
  5. For those with low attention spans or limited time, consider doing a 'rug' design stencil on the main floor -- this will eliminate having to cover the small/odd shapes of the obstructions in the border of the layout (railings, columns, etc.).  Also, consider doing a solid color stencil.  While less vibrant, this will enable you to use a roller for application, drastically speeding up the process.  I should note that I'm quite happy with my choice to buy the professional, larger size stencil template. 
Good luck!

Porch Project: Here comes the hotstepper

After sealing the main porch, I tackled the stairs.  This was fortunately an easier process and took just 2 days (two hours after work Friday, 5 hours on Saturday).

I stenciled a couple of Moroccan star patterns on each step, with a simple accent in between.  This was fairly easy, only made difficult because of the degradation of my paintbrushes.  Here's a tip for you -- buy a lot of higher quality stencil brushes in various diameters at the start of the project.


On the risers, I alternated two border patterns.  I kept the same color scheme as the porch floor, but added in a royal blue to complement the front door.  This was leftover from painting our cornhole set (Go Nats!).  


I decided to only use sealer on the risers because of how slippery it made the surface of the porch.  I don't need some trick-or-treater slipping and suing us!

Next up, it all comes together!

Monday, October 22, 2012

Porch Project: Protective Paint

The final phase of the stenciling project was to apply a few coats of protective clear coat.  I'm hoping this will help keep the paint from fading or flaking (especially since I used exterior and interior paints, instead of all porch paint!).

I had a tough time finding clear coat that wasn't high-gloss. I didn't want our porch to be all shiny!  And I worried about the slip-factor.

Finally, I found Behr Low-Lustre sealer for concrete.  It pours out milky but dries clear.


It was a pretty easy task to apply the first coat.  I used a small roller for the corner areas. I switched to a larger roller for the main part of the floor but found it left the sealer a little gloopy/bubbly, so I finished with the small roller to get a smooth finish.

I used the extension handle and was done in no time!


Now I just have to add a few more coats (more = better protection?).

Porch Project: Stencil Patchwork

After finishing the main area of the porch stencil painting, I was left with a few remaining white spaces in the edges by the house, the railings and the columns. I wasn't looking forward to this part because it required bending or cutting the stencil pattern, or possibly even free-hand painting.


Turns out it was not too bad. I did the largest areas first, then methodically cut off pieces of the stencil to fit against the barriers.  By the end of the night, I was left with a pile of about 30 stencil pieces. I powered through the project on a nice evening after work and finished it off. Whew, no more stencil painting!  At least on this part...


Tuesday, October 16, 2012

Inspiration from the Renovator's House Tour

I took a break from the stencil painting project over the weekend and went on the Renovator's House Tour in Capitol Hill.  This is a yearly event where you can tour 12 renovated homes -- and take a sneak peek into the lives of your neighbors!

Here are some pictures I took for inspiration on potential projects for our house:

1.  For the backyard, I would love to add a planter box, or better yet, a stone walled landscaping feature!


At the very least, vines or greenery on the fence.

2.  I loved this air intake cover -- I never would have thought to do this!  Adds a neat vintage flair.

3.  The basement.  We have ideas of exposing a brick wall... and I definitely want to refinish the ceiling.  We are nervous about the condition of the brick in the basement interior wall because we've heard that is where the lowest quality bricks are used.  Nice to know we could paint it white for a nice finished look if needed. 


4.  Finally, would love to add an exposed brick arch doorway like this!

Doors to the past

Bare walls no more!

We finally decided on some art in the bedroom.  I love these shutter doors from Oman -- the carved wood and painted tiles add a neat dimension to the shutters.

Eventually we might get a 3rd or 4th shutter to balance and fill the space better.


Sunday, October 7, 2012

Porch Project: Stencil City

I spent the day stenciling while jamming out to Fergie and Ludacris (my mp3 player with a speaker has a frozen playlist circa 2007). 

It took about 30 minutes to paint each set of the stencil, which isn't too bad.  In between sets I took a break to stretch out my back, wash my hands and motivate for the next set.  It took most of the day to do 10 sets in the main porch floor area.

The next stencil sets will be partial overlays and creative positioning to finish the floor. To complete the floor area under the railing, I was able to hang the stencil off the ledge and paint the partial stencil.  I fear the next areas won't be as easy!


Let's hope the weather clears up so I can do some painting after work this week!

As for the steps, I am going to give them a base gray layer (any votes on the dark vs. light gray paint?), then stencil that star pattern on the stair base, with the border on the face.  Next weekend?


Porch Project: Start of Stenciling!

I fanatically tracked my stencil shipment, as it made its way from San Diego to southeast DC.  The weather forecast had been full of rainy days, with one glorious day of sun on Saturday. 

Fortunately, my stencil shipment arrived as scheduled on Friday as I finished off the last of the preparations to the porch surface.

There are countless blogs and resources about how to start an allover stencil to line up the patterns, but it didn't seem to make a difference to me with a uniform design.  I was more concerned with making sure the initial placement was straight so that the pattern wouldn't veer lopsided across the porch.  This is not easy when nothing about our house is completely square! 

My other concern was with the size of the stencil -- I wanted to be smart with placement to minimize the areas of awkward leftover space for stenciling.  Keep in mind that there is a border around stencil sheets, so I would have to fill up areas directly against the wall and do some creative work around the railing posts.

After staring at the floor for awhile and pacing around, I ended up just lining the stencil up with the base of the door step.  Go time!

I taped the corners of the stencil down and got to work!

I followed standard instructions:
1.  Dip stencil brush into paint, lightly.  Tap off most the paint.
2.  Start in center of stencil window opening, tap to transfer the paint. 
3.  Move out in wider circles.  This helps keep the paint from bleeding under the edge of the window.

Repeat, repeat, repeat!

I realized that the stencil design had some small shapes I could paint in contrasting accent colors.  I chose a green and a blue.  This paint was straight-up interior paint jar samples, but since they are only about the size of a quarter, I took the risk!


I love the result of the first stencil!

Porch Project: Paint Problems

After all the tedious paint scraping and pressure washing, it was finally time to get tackle something fun -- picking out paint colors!  Little did I know, this would cause the most stress.

It all started on a good note.  I went to Lowe's and got dozens of paint chip samples and pestered anyone in my path on color combinations.  I will confess to finding inspiration for (read: stole) the colors from 
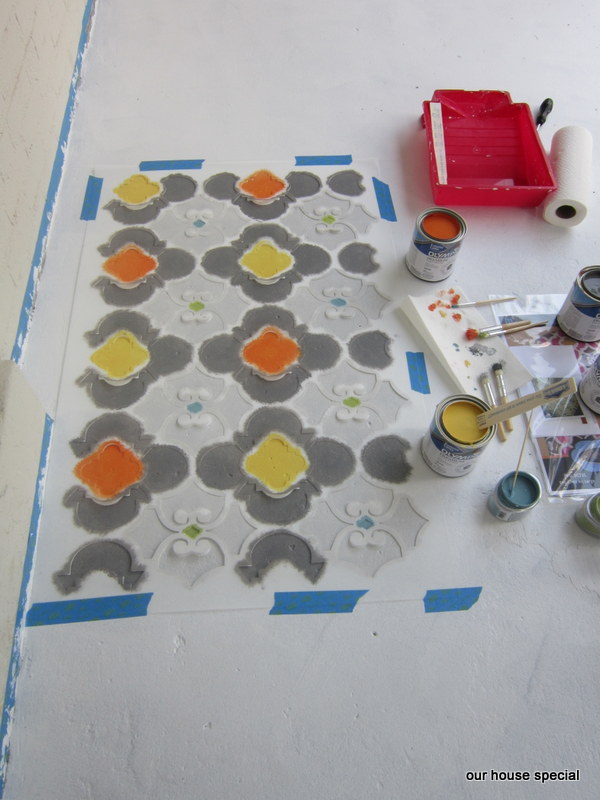
this project on the DIY network.  It's tough to visualize stencil patterns in various colors!

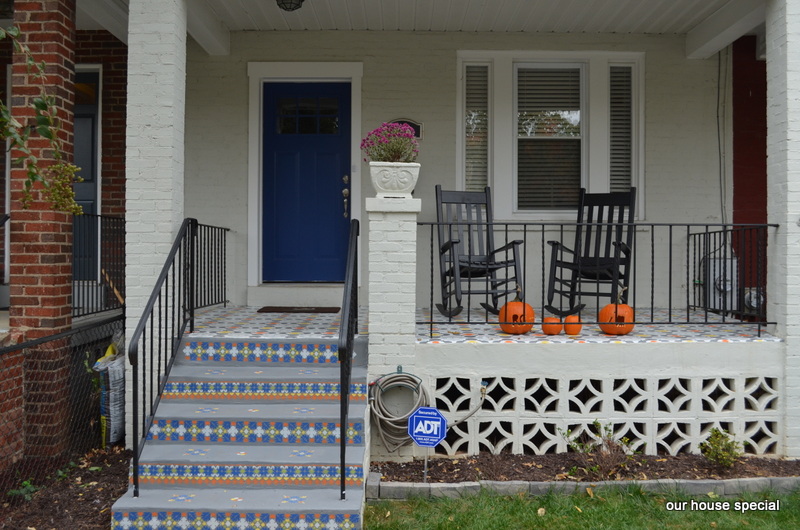
I went with a light gray (Secret Passage, #D58-2) and a dark gray (Dover Gray, #D58-4) for the main pattern, with accents in orange (Field Poppy, #A24-6) and yellow (Golden Glow, #B12-3) all in Olympic Premium Exterior paint in satin.  I hoped these would complement our bright blue door.

Anyone see the problem?  Yes, instead of buying the 'Floor/Porch' paint, I bought regular Exterior paint, without thinking about it.  Cue two days of stressing back and forth over whether it would be disastrous to use.  Would it all flake off?  Would it stand up to foot traffic?  The issue was that the porch paint only came in gallon buckets (that I could find at the 4 stores I checked) and I only needed a quart of each color. Waste of paint and money? 

I asked our friendly 'profesionals' at Glidden and Home Depot, but no one was sure (as a sidenote, the guy at Home Depot told me that it would look 'weird'.  What does that even mean?!).  After a stressful call to my dad, he convinced me that the paint would be fine, especially with the topcoat sealant I was planning to use.  Sold!

The other unexpected problem was in finding stencil brushes.  I opted not to buy the recommended 1" stencil brushes from the company that sold me the stencils, thinking I could just pick them up locally.  Turns out, they don't sell stencil brushes, especially that large at Lowe's, Glidden Paint or the couple craft stores I visited.  I finally found some 3/4" brushes at Home Depot, but I regret not buying them from the stencil store directly.  Lesson learned!

Next up, the moment you've all been waiting for -- stenciling begins!

Porch Project: Prepare for Painting

The next phase of the project was to pick the paint colors and get the base layer down.

On my millionth visit to Lowe's, I picked up Seal-Krete Lockdown concrete bonding primer, which would help the paint stick to the concrete (especially in the previously painted areas).  I applied this to the surface the night before the main painting (this has to be done just 4-24 hours in advance).  It went on milky and dried clear, and created a slightly tacky surface.


I also got Valspar Porch & Floor Paint (latex satin) in white.  This would serve as the base coat on which the colored stencil pattern would go.  In hindsight, I should have considered using an off-white color to match the painted brick exterior of our house, but no matter.

After taping up the walls edges, fence, etc, I painted the base coat. I did a second coat later that night because it was looking a little sparse in some areas.


Next, colored paint!

Porch Project: Prep Work

The first step of our project was to get off as much of the gray paint as possible from the concrete and prep the concrete for new paint.

1.  I used a pressure washer (thanks, Mr. T!) to get a lot of the paint off the steps with the high-powered stream.

2.  I applied a paint solvent (Jasco Premium Paint & Epoxy Remover) and let it sit for 20 minutes, then scraped off the loose paint. 


At this point, we realized the tedium ahead to get off all the paint.  We were racing the calendar to get the paint on before the fall temperatures dropped too much (and let's face it, we're impatient), so we decided just to concentrate on the well-worn area in front of the door and the steps and leave the rest of the paint alone.

3.  Next up, we wanted to patch up the huge holes and fix the concrete area around the railing.  I mixed Sta-Dri Link (a bonding agent) with H&C Quick Patch & Repair cement mix and patched up the area as best I could. 


4.  The final step was to clean the whole area with a TSP substitute to remove any remaining dirt and grease.  Sass cat was concerned.


Next up, we get ready to paint!

Porch Project: The Plan

It all started innocently enough.  Our concrete porch is painted gray and started to show some wear and tear.  Paint was flaking off on the steps and it generally looked shabby -- not the first impression we want to make for visitors! 

I was googling for instructions on resurfacing concrete, when I came across the most beautiful painted stencil porch from Design Amour:


Could you just die?!  After reading through their process (custom-sized one time use stencils ($$), concrete stain, etc.), I realized it might be a little too ambitious for us. 

I found some great stencil options on Royal Design Studio, and picked out the following for the floor porch and stairs:


Stick around for in progress updates!