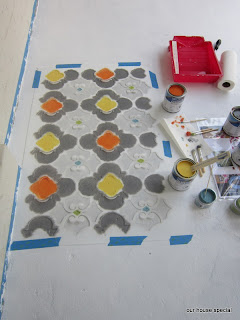
I fanatically tracked my stencil shipment, as it made its way from San Diego to southeast DC. The weather forecast had been full of rainy days, with one glorious day of sun on Saturday.
Fortunately, my stencil shipment arrived as scheduled on Friday as I finished off the last of the preparations to the porch surface.
There are countless blogs and resources about how to start an allover stencil to line up the patterns, but it didn't seem to make a difference to me with a uniform design. I was more concerned with making sure the initial placement was straight so that the pattern wouldn't veer lopsided across the porch. This is not easy when nothing about our house is completely square!
My other concern was with the size of the stencil -- I wanted to be smart with placement to minimize the areas of awkward leftover space for stenciling. Keep in mind that there is a border around stencil sheets, so I would have to fill up areas directly against the wall and do some creative work around the railing posts.
After staring at the floor for awhile and pacing around, I ended up just lining the stencil up with the base of the door step. Go time!
I taped the corners of the stencil down and got to work!
I followed standard instructions:
1. Dip stencil brush into paint, lightly. Tap off most the paint.
2. Start in center of stencil window opening, tap to transfer the paint.
3. Move out in wider circles. This helps keep the paint from bleeding under the edge of the window.
Repeat, repeat, repeat!
I realized that the stencil design had some small shapes I could paint in contrasting accent colors. I chose a green and a blue. This paint was straight-up interior paint jar samples, but since they are only about the size of a quarter, I took the risk!
I love the result of the first stencil!


No comments:
Post a Comment